I would like to invite you to a series of articles on basic issues in the field of machining. We witness the rapid development of technology, however, to be able to fully understand the changes taking place, it is worth having basic (sometimes historical) knowledge in this field. If you are passionate about cutting I hope that the next texts will be a nice reminder. However, if you just take your first steps in the CNC area I believe that you will learn some interesting facts. Let’s get started!
Which process is simpler – turning or milling? A tricky question, I would perversely answer that drilling. Why? From the programming point of view, it is only one block or maybe two. Enter G1, exit G0. Thank you, that’s all for today.
I was joking. In fact, it might seem to be an uncomplicated operation. Well, it isn’t. The multitude of problems that might be encountered may be discouraging – broken drills, low hole quality, tool runout, wrong size, short service life and thus – high cost per piece, entangled long chips on the drill and a lot other issues. I will try to give some tips on how to approach the drilling topic in order to consciously eliminate the above – mentioned problems.
But let’s start with a brief theory. In case of drilling but also reaming, threading and counterboring, we refer to point – to – point control. The principle is simple, the tool is positioned on a given point with a rapid movement, then the machining is performed with a working movement in one axis (usually in the Z axis) (Drawing 1a).
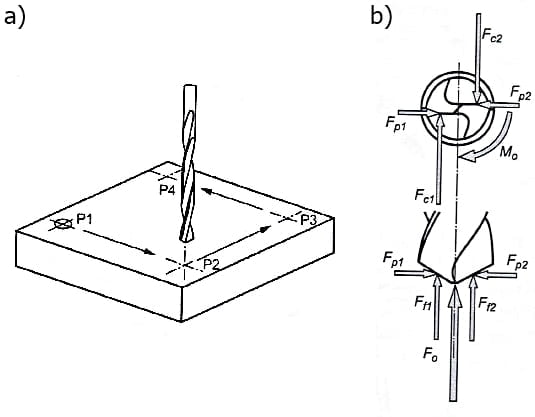
Drawing 1. a) Point control, b) Cutting force distribution during drilling [source: “Programming CNC machine tools” W. Grzesik, P.Niesłon, P. Kiszka; “Machining” K. Jemielniak]
Kinematically, the axial force and the torque are distinguished in drilling (Drawing 1b). The axial force is the sum of the feed forces Ff1 and F2, while the moment is obtained from the forces Fc1 and Fc2. The drawing still shows the resistance forces but in this case they reduce each other. (Note for enthusiasts – if suprisingly you do not know the great position “Machining” by Krzysztof Jemielniak, I recommend you catch up – cutting forces, angles in the tool scheme, tool materials and a lot more – for connoisseurs of pure theory).
The first problem with drilling is that you can’t see anything while cutting. We approach the drill, position it and the only thing we are sure of is the distance of the drill to the workpiece. Next, entering into the material and leaving. So how to judge if it is ok? First of all, the sound should be uniform and smooth. Secondly, chip control – they should be relatively short C-shaped. Thirdly, the quality of the hole and its dimensions and tolerance. Fourth, observation of the tool – abrasions, wear and built-up edges can quickly indicate a problem in the process. Very often, it is enough to change parameters to obtain a satisfactory effect. Increasing the feed and internal cooling often solves the problem of long chips. Increasing the vc will eliminate the build-up and changing the holder from ER to hydraulic will make the clamping more precise and the runout will be reduced which will make the tool more durable. I recommend careful observation of the process even as simple as drilling.
The second problem of drilling appears at the very beginning, namely the problem of choosing the right drill for a given production task. To choose the right drill bit, it’s worth answering some basic questions. What machine will we drill on? What is the processed material? What hole tolerance do you need to achieve? How long should this hole be – 2D? Or maybe as much as 18D? How many holes to make – is it mass production or piece production? The range of drills is large but what to choose? If there is a large hole with a diameter of more than 20 mm to be made, an indexable insert drill will be the primary choice. Least accurate but sufficient for many machining tasks. The opposite case – large series, small diameter, accuracy important – in this case it is better to choose a solid carbide monolith drill. Definitely the most expensive choice for a start while the long life and high quality of the hole will compensate for the initial investment. There are also drills with a replaceable carbide tip which are a compromise between the drills mentioned before. They are more accurate than insert drills and due to the steel body they are more resistant to potential errors in use than carbide drills. Choosing a drill bit is not easy, it is best to contact your tool supplier before buying.
The third problem I will mention is drilling long holes. How to drill a hole, e.g. 12xD long? You definitely need a stable mounting and a suitable precise holder. The first topilot, a small rigid drill that will drill a hole 1.5xD deep. The next tool is a long drill which is inserted into the pilot hole at reduced parameters and with internal cooling turned off. This is to reduce tool vibration. After reaching the length of 1.5xD, drilling proceeds at the target cutting parameters with cooling on. Important note! In this case, during the withdrawal, the tool should work at reduced speed and appropriate working feed unfortunately not at the G0 feed. This time is very often omitted when estimating the machining time. To sum up – a good strategy is needed.
Finally, let me just mention that cycles facilitate the entire programming process. The most common choice is G81 which is standard drilling. If you drill a long hole with a HSS drill, for example, cycles such as G83 or G73 are a great choice. See a problem with counterboring? Missing bottom stop? Here you go – the G82 cycle will solve this problem.
I have presented some interesting aspects of machining connected with drilling. At first glance, a simple and undemanding procedure however, full of details.
Natalia Matuszczyk
Mechanical machining vs additive manufacturing
Cutting Tutorial – Turning

Hello! My name is Natalia Matuszczyk. I am a technologist, CNC programmer and process engineer at Barosz. A big fan of new technologies and solutions that improve production in accordance with the Lean Management philosophy. I am devoted to my work and interests and work is my passion. I like challenges and I am not afraid to be a woman in the male machining world.